4th Tutorial. How to Create A Free Website With Blogger.com
Welcome to the 4th tutorial on how to create a free website. In this tutorial we shall follow step by step on how to create a free website with blogger.com.
We are trying to teach about this because of many of us who couldn’t use wordpress.com to create their free website. Blogger seems to be very easy when compared to wordpress and you can earn easily with blogger than wordpress.com. This tutorial on how to Create A Free Website With Blogger.com is the easiest.
When you create a free website with blogger.com, they will add blogpsot.com to it.
Like wordpress.com, Blogspot allows you to build and host website for free.Blogger is owned by Google .
You can watch how to do it with these video clips. Watch them below and follow it gradually.
Or This
or read through this
Step 1: Login to Blogger
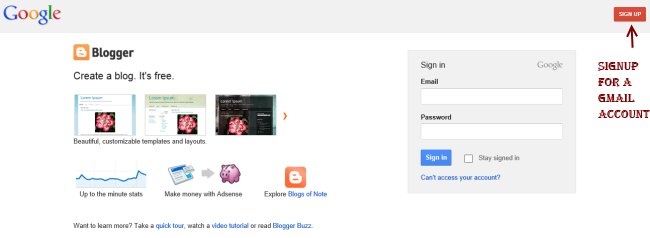
Go to http://www.blogger.com. When it opens, sign in with your gmail id and password, if you don’t have an account You can click the “sign up” button. Look at the top right corner. You can see the image below.
Step 2: Confirm your profile
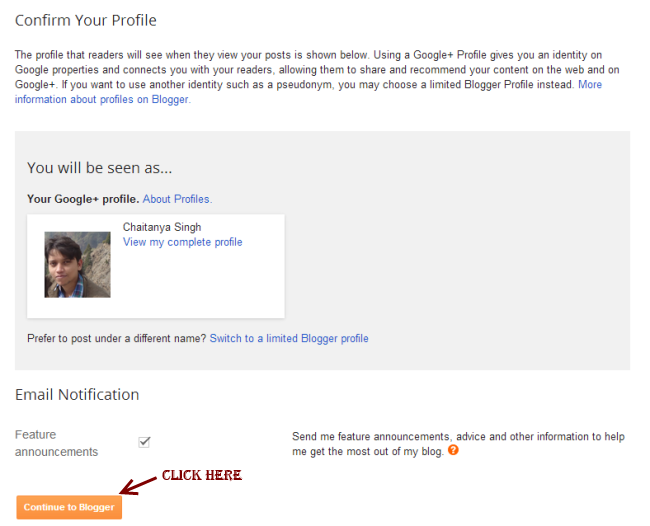
After logging in with your gmail account, Click on “Continue to Blogger“. Like the image below
Step 3: Create a New Blog
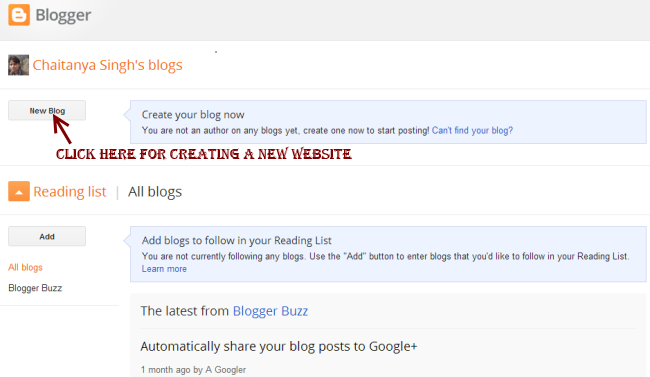
Then click on New Blog button to create a new blog.
![]() Step 4: Then Provide the blog’s domain name and title
Step 4: Then Provide the blog’s domain name and title
Here, provide the title and address of your website. For example: If you want to build a blog on reflection then the Address which is known as Domain name or site’s URL could be reflection.blogspot.com and title can be Chika’s Reflections. You must know that since these domain names are free, google will add blogspot.com by default.
If the domain name you want to choose is already registered. They will provide alternatives for you to try a different domain name until they mark it good.
Then choose a template (That is how you want the blog to appear and then click Create Blog)
sponsored
Step 5: then Start Blogging
By completing till step 4, you successfully own a website for free. Now, you can start posting posts/articles, click on start blogging!
6. Publish a post/article on blogspot website.
After successfully publishing your website, you can start posting articles on your new blog.
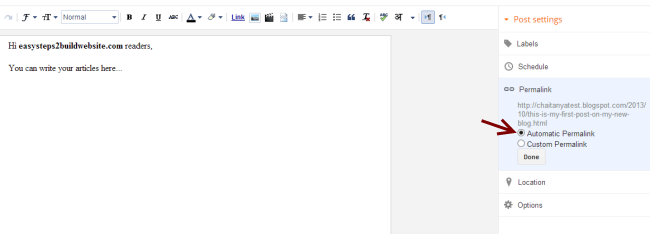
Check the image below. Put the content in that space there, then your title in the title bar and after writing your content in the space, Click on link if you have something to link, the next sign after link which looks like an envelope is for images, the next is for videos if you have any. Then hit the publish button to publish the post. In the image below, you will see automatic permalink indicated by the arrow, that is where your link is.
7. Change the look of your website
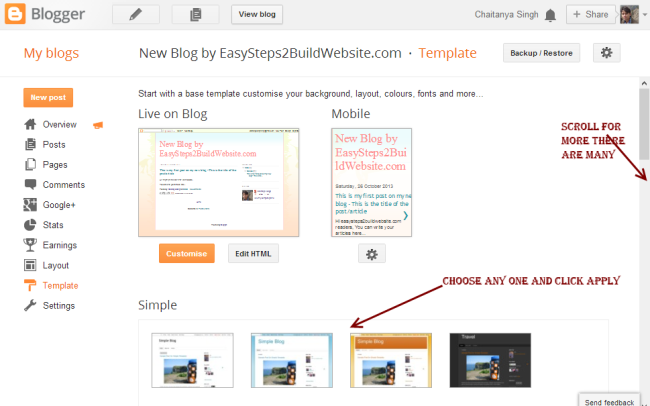
You can do this by changing the template of the website. Click on template, like the image below.
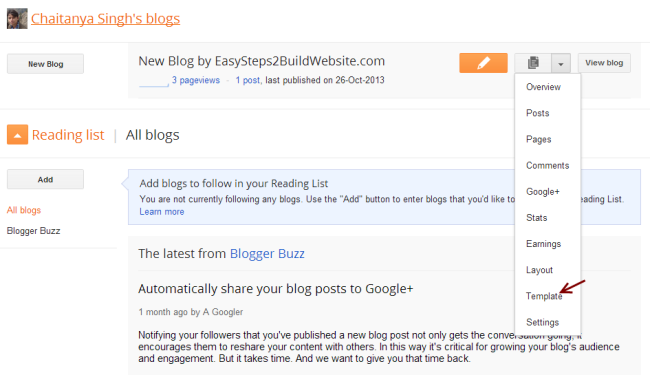 They will provide you with many templates, then choose the one you prefer, then click on apply the template button. You can also download free templates on google and upload them to your blogger.
![]() Change the look of navigation bar
Change the look of navigation bar
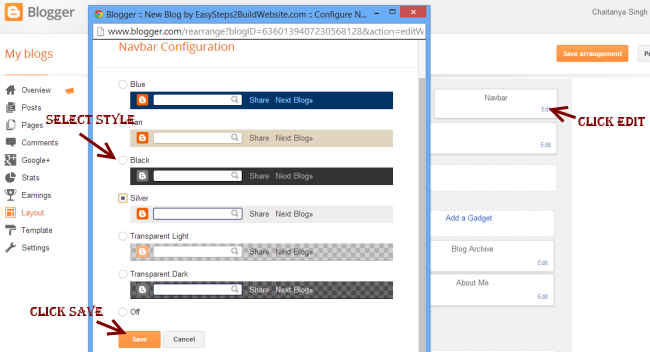
Go to the layout section from the sidebar and click on edit in the Navbar section. Select the look and style you want and click save!
![]() Add Favicon to your website
Add Favicon to your website
Favicon is a tiny image which you can see at the browser’s tab while opening a particular website. In order to change the default blogspot’s favicon do follow the below steps –
Layout » Edit Favicon
Choose a square image of size less than 100 KB and upload it.
![]() Add Gadget to your website
Add Gadget to your website
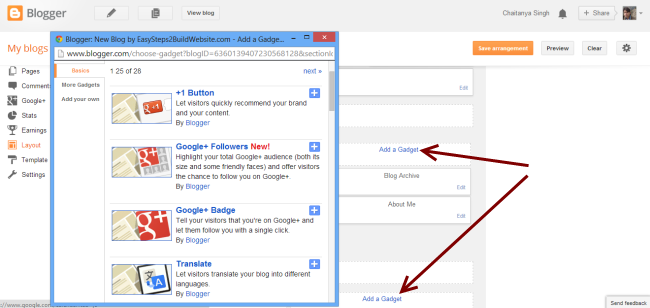
You can add Gadgets to the blog’s sidebar, below the navigation menu and in footers. Whenever you click on Add a Gadget button in the layout section, a popup window would come up where you can browse and add gadgets. Don’t forget to save the settings.
![]() Traffic stats for your website
Traffic stats for your website
Stats » Overview
Real time traffic status for your website. It would show you the traffic sources, audiences and many more details. Here, you can find out what all posts/articles/pages are getting most of the traffic and for which keywords. This will help you to boost organic traffic to your website.



 Step 4: Then Provide the blog’s domain name and title

 Change the look of navigation bar
 Add Favicon to your website
 Traffic stats for your website
Thank you Fr.
Thank you so much Padre. God continually blessing u.
Thanks Padre. Using a phone to carry out these settings is quite different, finding the icons and all
yes
I have read it.Thank you Padre
Thanks father for this. I did something like this a long while ago and I used wix.com. I wrote 3 posts. When I saw that no one actually was interested in what I wrote. I gave up. What is the advantage of using wix.com over blogger.com? Thanks
blogger is owned by google
Thank u Fr. I created mine own yesterday.
May God bless you and keep you for us.
Created. thanks fr for this opportunity
Done
Thank Fr., I created mine successfully. mailoushi.blogspot.com
nice
This is my site Fr. https://jtm339500149.WordPress.com
Good
Fada, thanks again. God bless you real good
God bless you richly padre, successfully created.
educativeinteractions.blogspot.com
nice
Fr. I have created mine in WordPress but after studying Blogger, I prefer blogger. Can I go ahead and create in blogger
you can
Still not successful with mine.
Padre please I am unable to continue from no 6- (the part about adding a link, image or video) and no 7. I can’t find where to apply these on my web page.
Thanks for everything
I will make the tutorial today
NAME – Izuchukwu Ogochukwu J
Website Address – ogochukwudotcom.wordpress.com
Niche – Inspirational and Bible quotations.
Name : Okoro Kingsley Akachukwu
Blog: Catholicfaithanddoctrine.blogger. com
Niche: Catholic faith and doctrine
Thank you fr. God bless you